Context
You've just enabled txAdmin on your FiveM server and created your admin account. The next step is to configure your server, meaning installing the content that will run on it (framework, resources, database).
txAdmin offers a 5-step setup wizard to guide you through it. In this guide, we'll cover the two methods most used by Winheberg customers.
- Popular Recipes, to automatically deploy a ready-to-use framework (ESX Legacy, QBCore, Qbox, FiveM Basic) if you're starting with an empty server
- Existing Server Data, to use a server already uploaded to your instance if you're migrating or already have your own base
Prerequisites
Before you start, make sure you have the following.
- A FiveM server with txAdmin already enabled and an admin account created (check our dedicated guide if that's not the case yet)
- Your Server Registration Key (also called License Key), available from the Cfx.re portal
- If you're going with Existing Server Data, your server already uploaded to the
/home/container/folder with aserver.cfgand aresources/folder
Which method should you choose?
Before diving in, take a few seconds to identify your situation.
| Situation | Recommended method |
|---|---|
| I'm starting a new server, I have no files | Popular Recipes |
| I want a ready-to-use RP framework (ESX, QBCore) | Popular Recipes |
| I want a minimal server to tinker with | Popular Recipes (FiveM Basic Server) |
| I've already uploaded my server via SFTP | Existing Server Data |
| I'm migrating from another host | Existing Server Data |
If you're unsure and have no existing files, go with Popular Recipes. It's the simplest method, and you can always modify the server afterward. The ESX Legacy and QBCore recipes are solid bases for most French-speaking RP projects.
1. Enter your server's name
The first time you log in to txAdmin after creating your admin account, you land on the configuration wizard. The first step asks for a short name for your server. This name will show up in the txAdmin interface and in Chat/Discord messages.
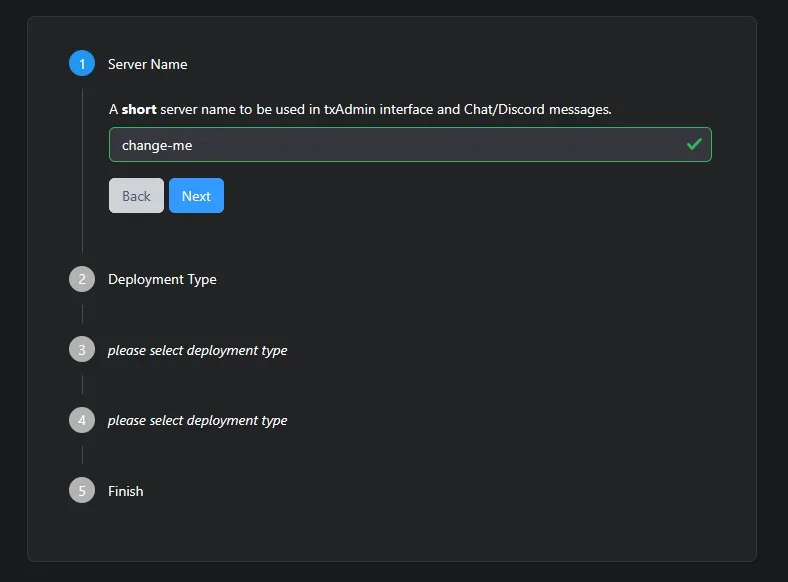
- Replace the default value
change-mewith the name of your choice (for examplemy-rp-server) - Click Next to move to the next step
This name is used internally by txAdmin and isn't the public name shown in the FiveM server list. The public name is configured later in the server.cfg through the sv_hostname variable.
2. Choose the deployment type
At the Deployment Type step, txAdmin offers 4 options. We'll focus on the 2 most used ones.
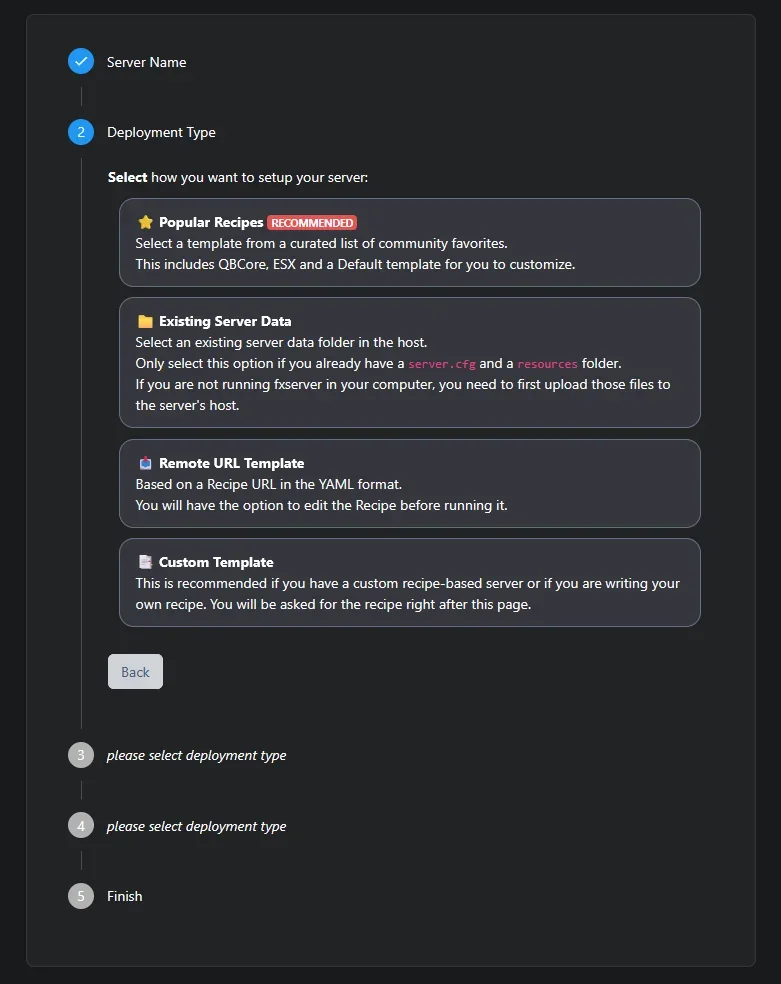
- ⭐ Popular Recipes (RECOMMENDED), for starting with a ready-to-use framework
- 📁 Existing Server Data, for using a server already uploaded (
server.cfg+resourcesfolder) - 🔗 Remote URL Template, for deploying from a custom recipe YAML URL
- 📝 Custom Template, for advanced users writing their own recipe
Click the option that matches your situation, and move to the corresponding section below.
Method 1. Popular Recipes
This method uses the official recipes curated by the txAdmin community. A recipe is a file that describes every deployment step (downloading resources, creating the database, configuring the server.cfg).
3. Select the template
At the Select Template step, txAdmin offers a list of popular templates.
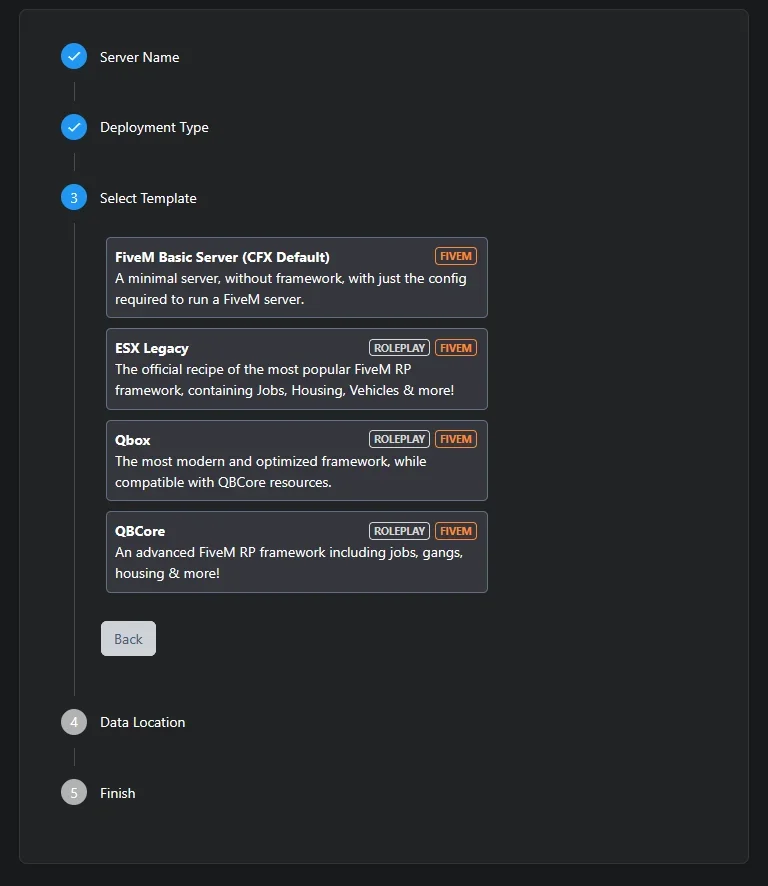
| Template | Type | Description |
|---|---|---|
| FiveM Basic Server (CFX Default) | FIVEM | Minimal server with no framework, just the config to run a FiveM instance |
| ESX Legacy | ROLEPLAY / FIVEM | Official recipe for the most popular RP framework (Jobs, Housing, Vehicles, etc.) |
| Qbox | ROLEPLAY / FIVEM | Modern, optimized framework, compatible with QBCore resources |
| QBCore | ROLEPLAY / FIVEM | Advanced RP framework including jobs, gangs, housing, etc. |
Click the template that matches your project to select it.
The vRP framework is no longer among the official templates. If you want to use it, you'll need to go through Custom Template with the URL of a vRP recipe available on GitHub, or manually install the framework with Existing Server Data.
4. Set the data location
At the Data Location step, txAdmin suggests a default path where the server will be deployed. This path is automatically generated based on the chosen template.
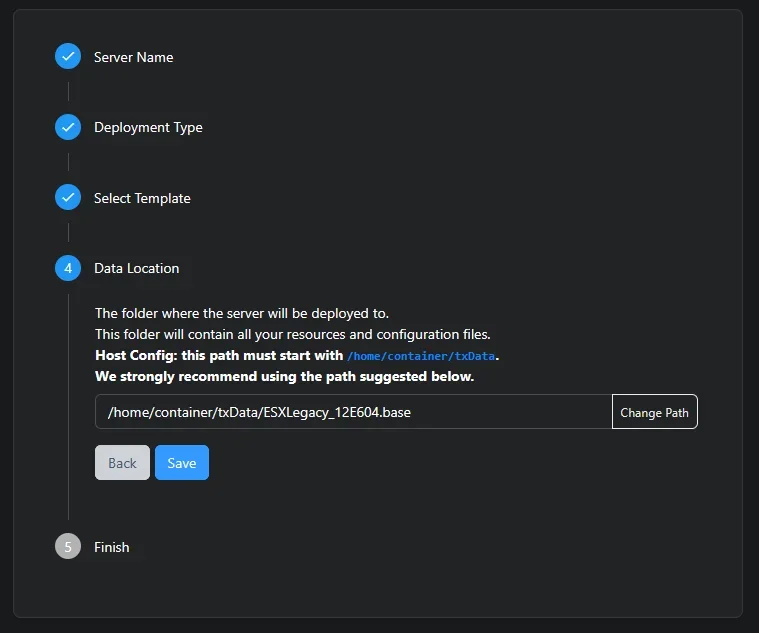
The path follows this format.
/home/container/txData/TEMPLATENAME_XXXXXX.base
The path must start with /home/container/txData. txAdmin strongly recommends leaving the suggested path unchanged, unless you know exactly what you're doing.
Click Save to confirm the location.
5. Launch the Recipe Deployer
At the Finish step, txAdmin tells you everything is ready to deploy.
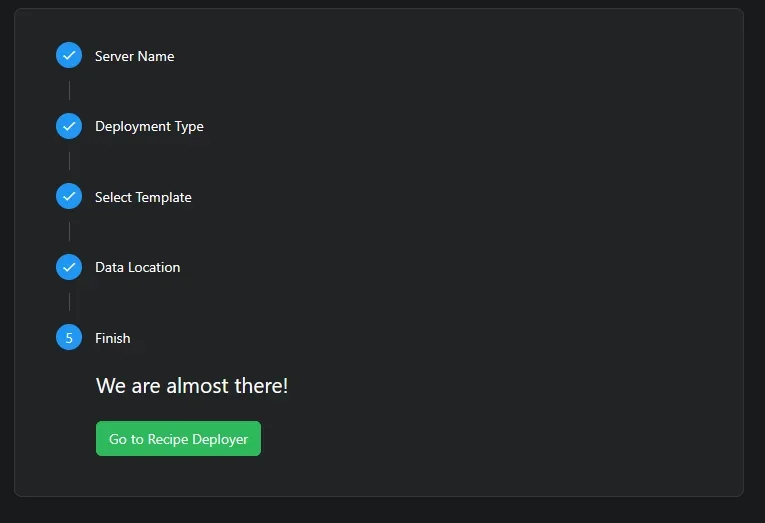
Click the green Go to Recipe Deployer button to access the recipe deployer.
6. Enter the Server Registration Key
You'll now land in the Recipe Deployer, which runs through 4 internal steps (Review Recipe, Input Parameters, Run Recipe, Configure server.cfg).
At the Input Parameters step, the main field to fill in is the Server Registration Key.
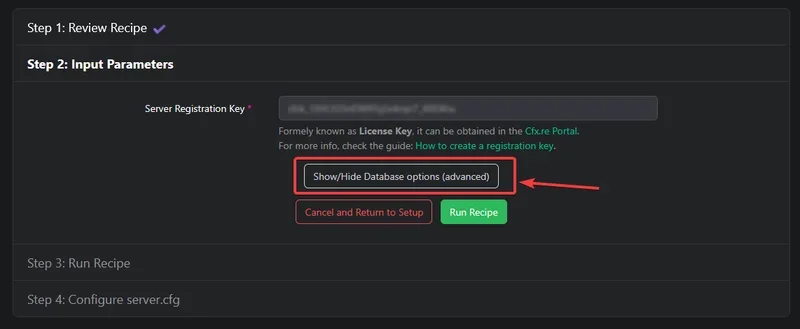
- Get your key from the Cfx.re portal, also called the License Key
- Paste it into the Server Registration Key field
To reveal the database options (needed if your framework uses MySQL, like ESX or QBCore), click the Show/Hide Database options (advanced) button just below.
7. Configure the database
Clicking Show/Hide Database options (advanced) reveals the MySQL configuration fields.
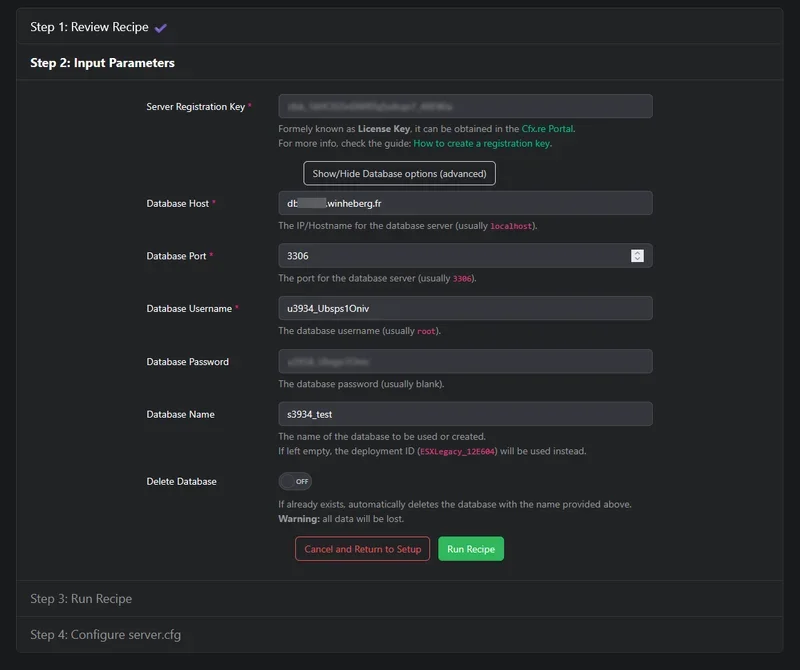
Get your credentials from the Databases section of your Winheberg gaming panel, then fill in the fields.
| Field | Value |
|---|---|
| Database Host | dbXX.wh-nodes.net |
| Database Port | 3306 |
| Database Username | your username in the uxxx_Exemple format |
| Database Password | the associated password |
| Database Name | your database name in the sxx_Exemple format |
If your MySQL password contains characters like =, ;, ", or ', you'll likely run into issues later with OXMYSQL. Consider regenerating a clean password from the gaming panel before continuing. Check our guide on connecting FiveM to MySQL for more details.
The Delete Database toggle (OFF by default) deletes all data in the existing database before deployment. NEVER enable it if you already have data in this database, you would lose it permanently. For a first deployment on an empty database, you can leave it OFF, txAdmin will create the necessary tables.
Once every field is filled in, click Run Recipe to start the deployment.
8. Follow the deployment
At the Run Recipe step, you'll see the tasks running one after another in real time (downloading from GitHub, copying files, connecting to the database, etc.).
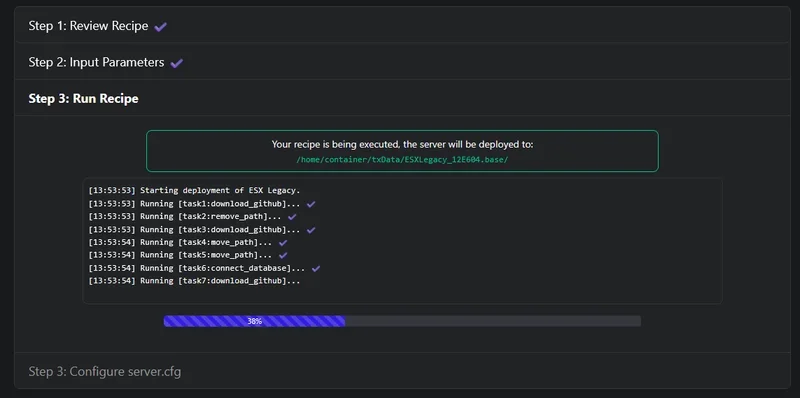
You'll see a series of logs like this.
[13:53:53] Starting deployment of ESX Legacy.
[13:53:53] Running [task1:download_github]... ✓
[13:53:53] Running [task2:remove_path]... ✓
[13:53:53] Running [task3:download_github]... ✓
[13:53:54] Running [task4:move_path]... ✓
[13:53:54] Running [task5:move_path]... ✓
[13:53:54] Running [task6:connect_database]... ✓
[13:53:54] Running [task7:download_github]...
This step can take several minutes depending on the framework's size and your connection speed. A progress bar shows the overall advancement. Don't close the window during the process.
9. Start your server
Once the deployment is done, txAdmin offers to configure the server.cfg (step 4 of the Recipe Deployer). You can edit it directly from the interface, or leave the default values to start right away.
Then click Save & Run Server to save the configuration and start your FiveM server. If everything goes well, your server shows up online in the console and is ready to welcome its first players.
Method 2. Existing Server Data
This method is ideal if you've already uploaded your server to your instance, whether through the Winheberg panel, via SFTP, or because you're migrating from another host.
Check that your files are in place
Before continuing, make sure your server is actually present in your instance's folder.
- The
resources/folder is filled with your framework and resources - The
server.cfgfile is present in the folder you plan to point txAdmin to - Any custom configuration files are uploaded
If you're migrating from another host, don't forget to also import your MySQL database. Without it, your server will start but with no player data or economy. Check our guide on phpMyAdmin to easily import a .sql file.
Enter your server's path
After selecting Existing Server Data at step 2, txAdmin asks for the absolute path to the folder containing your server.cfg. On Winheberg, that's /home/container/.
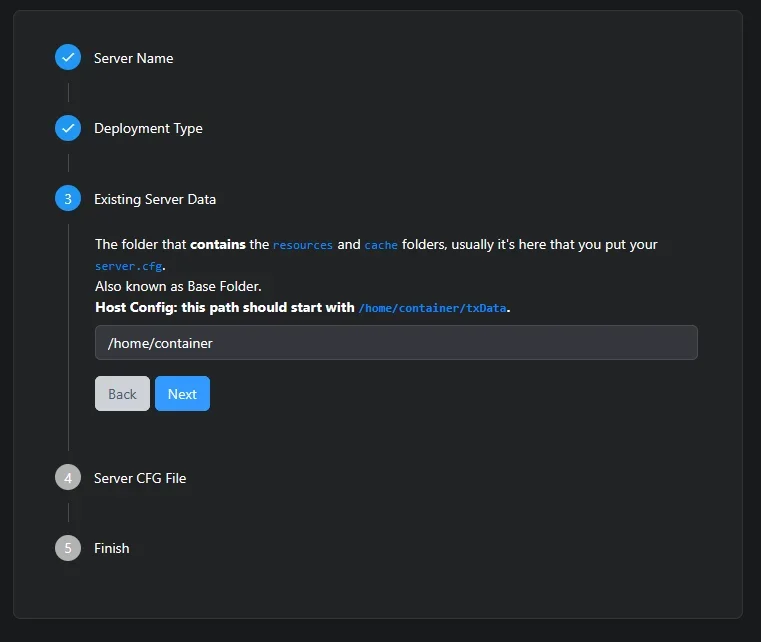
Point to the folder that directly contains the server.cfg file, not a parent folder. If txAdmin can't find the file, it will refuse to continue.
Check the server.cfg
txAdmin will automatically read your server.cfg and detect the important parameters. Check that the following are correct.
- The
sv_licenseKeyline contains your Server Registration Key (available from the Cfx.re portal) - The
mysql_connection_stringline points to your new Winheberg credentials (dbXX.wh-nodes.net+ your access details) - The resources listed with
ensurematch what's actually present in yourresources/folder
If you're migrating an existing server, your old host's MySQL credentials won't work at Winheberg. You'll need to use the ones provided by the Winheberg panel, and import your data into the new database through phpMyAdmin.
Start your server
Confirm the configuration and start your server from the txAdmin dashboard. Keep a close eye on the console to catch any errors on first launch.
If you run into trouble
Here are the most common errors during initial setup.
❌ A download_github task fails
If a download_github step fails in the Recipe Deployer.
- Check that your server has outbound internet access (normally always the case at Winheberg)
- The source GitHub repository may be temporarily unavailable, try again a few minutes later
- If the issue persists, the template may have been updated and the repository URL changed, try a different template
❌ The connect_database task fails
If the database connection fails during deployment.
- Check that you correctly entered all 5 fields (Host, Port, Username, Password, Name)
- Check that your password doesn't contain problematic characters (
=,;,",') - Check that your database is active in the Winheberg gaming panel
- Check that you're using the
dbXX.wh-nodes.nethost and not another address
❌ Existing Server Data, txAdmin can't find the server.cfg
If you get a "server.cfg not found" error.
- Check that the file is actually present in the folder you pointed to
- Check that the absolute path starts with
/home/container/ - Check that the file is named exactly
server.cfg(case-sensitive, no trailing.txt) - Check that you pointed to the direct folder containing the file, not a parent folder
❌ The server starts but shows resource errors
If some resources refuse to load after deployment.
- Check your
server.cfgforensurelines pointing to missing resources - Check the console to identify the exact resource causing the issue
- Check each resource's dependencies (some need other scripts to work)
❌ The Recipe deployment stays stuck
If the progress bar stops moving for several minutes.
- Wait a bit longer, some recipes download several GB of data
- Check the txAdmin logs to see if a specific step is failing silently
- If it stays stuck, restart your server and run the wizard again from the start
Best practices
A few recommendations for setting up your server properly from the start.
- Make a backup of your database before any Recipe deployment on an existing database (the recipe can overwrite tables, even without enabling Delete Database)
- Write down your credentials for MySQL and your Server Registration Key in a secure password manager
- Test your server with one or two trusted players before opening it to the public
- Read the documentation of your chosen framework (ESX, QBCore) to properly understand how it works before you start changing things
- Avoid editing the
server.cfgby hand while the server is running, use the txAdmin interface instead for routine changes
Need help?
If your Recipe deployment fails, if txAdmin can't find your server with Existing Server Data, or if you run into an issue while migrating from another host, our team is here. Open a ticket in the Technical department from your client area, fill in the Related Product field with the server in question, and attach the txAdmin and console logs.
Your FiveM server is now configured and ready to welcome your players, enjoy your RP adventure 🎮